


FltsimFlyboy
-
Posts
26 -
Joined
-
Last visited
Content Type
Profiles
Forums
Downloads
Posts posted by FltsimFlyboy
-
-
@Flieger1974 Make sure you are clicking both the trim buttons together. Also, I've noticed before that sometimes, you might need to click once and then click and hold for it to repeat.
The light switches are programmed in the way they are physically in the cockpit - up is off and down is on.
-
 1
1
-
 1
1
-
-
@paladin569 Use 0 to tun off, 1 to turn on
0 (>L:ASCRJ_OVHD_LDG_LEFT, Number)
1 (>L:ASCRJ_OVHD_LDG_LEFT, Number)
Same for the RIGHT and NOSE
-
1
-
-
Seems to be an issue with the sim ↔ crj connection, unfortunately.
Can you try this and let me know if it works?
In AAO, go to the scripts editor and create two new scripts:
-
Title: ASCRJ_GEAR_UP
Code: 0 (>L:ASCRJ_GEAR_GEAR_LEVER, Bool) -
Title: ASCRJ_GEAR_DN
Code: 1 (>L:ASCRJ_GEAR_GEAR_LEVER, Bool)
Remove existing gear assignments from MSFS and AAO (if any). Then, in the assigned buttons, create gear up and down button assignments and set these scripts to the key down events.
Try it and let me know if the gear disagree warning is fixed, I'll add it to the template in that case.
")
-
2
-
Title: ASCRJ_GEAR_UP
-
@Azorian77 Sorry for the delayed response. The lights on the bravo work based on the MSFS default autopilot states. The CRJ uses its own custom variables for controlling the autopilot, so the lights do not match up. I tried changing the json file for the Bravo bridge driver to read from those variables, but it seems like the driver cannot read from custom variables.
Probably the only way to get around this is to write a custom driver, or better yet, Aerosoft expands the functionality of the driver with LED profiles, etc. as in the X-Plane version.
-
2
-
-
@asaboveatlantic Hi! I haven't been able to find a way to do fixed increments. The variable values that the CRJ uses for these increment/decrements are acceleration based. A value of 1 means the least acceleration, barely noticeable, starts off with the least possible change - 1deg, 100ft, etc., and if you can turn it consistently for some time, it picks up some acceleration. This is very hard to do on the bravo rotary. For the acceleration mode, I have set it to a value of 2, which has a slightly higher acceleration, and starts off with higher increments - 12deg, 200ft, etc. (why these values, I have no idea; my guess is that it follows some exponential curve). However, you'll notice that if you turn a bit faster, it picks up acceleration quite fast, and the increments are much higher.
I have experimented with other values, and I found 2 to be the most optimum. Any higher and the acceleration is way too fast - it only takes 4-5 quick turns to make the altitude go from 1000ft to 40000ft.
So, if you want the increments to be higher, turn the knob a bit faster in acceleration mode, then switch over to the normal mode and make fine adjustments.
Sorry, I know that it is not the answer you are looking for, but hopefully my explanation makes sense of the acceleration behavior.
Sidenote, if flicking the switch to change modes feels a bit odd, you can map it to the flap down button, since it is spring loaded. Set the Key Down event to the script AAO_RROT_ACCEL_on, and Key Up event to AAO_RROT_ACCEL_off. If you have it set like that, you can press and hold the flaps down and turn the knob for acceleration mode, and release the flaps to go back to normal mode. (Of course, you cannot use the flaps lever for the actual flaps operation, you need to use an axis for that.)
-
1
-
 1
1
-
-
@Dave March Glad you find it useful
.
You do not need to manually edit the templates. What you can do is, once you have imported mine, remove the assignments that you do not want from the 'assigned buttons' list in AAO. Customize as per your needs and then save it as a new template. You can then apply your custom template to the other liveries.
You can leave the scripts imported as is, they won't be executed unless called explicitly by a specific assignment.
-
1
-
-
Yeah, that's why I shared the scripts along with the template
-
1
-
-
@bLindyeThanks! This will make it much more manageable and easier to make changes. Earlier I couldn't figure out how to call scripts from other scripts - I understand how to do that now.
-
I have uploaded a new version, with an updated FCP template and associated scripts. The issue of rotaries not being detected should not occur (I haven't encountered it) - the fix is based on blindye's method. Also, one new feature as a result of this change - rotary acceleration! You can now toggle a switch to enable acceleration for those slow-moving alt/hdg/speed/crs1 knobs.
In the template, this is assigned to the rightmost unmarked switch on the bravo, since that is the closest to the right rotary, and you can easily flick the switch with your other fingers while turning the rotary. If you want to do a press and turn, e.g., press the flap switch and turn the knob, it is also possible; you need to manually assign the scripts for that.
Before applying the new FCP template, please remove all FCP assignments to avoid duplicates/conflicts.
-
1
-
-
@pokes116Glad that you were able to fix the issue. I haven't checked bLindye's templates, but from the screenshot that you posted, it looks like the two rotaries are individually assigned to separate scripts, instead of using button combinations with a single script, as I have done.
I'll test this method out and if this really gets around the issue, I'll update my templates.
(Actually, this idea is great... Can think of quite a few interesting setup configs that can be made possible this way, which are otherwise limited by my button combo method.. Need to try it out
 )
)
Thanks for bringing this to my attention

-
@pokes116 This seems to be a AAO bug. When the template is initially applied/loaded, it doesn't detect the rotaries for some reason. Double click any of the assignments to open the change assignment window, and then close it. After that it detects the rotaries. Unfortunately, it is not always persistent. Every time AAO loads, you may need to do this.
-
@pokes116@Doc3d Once the aircraft is loaded and detected in AAO, click the green circle on the top to disconnect and then click it again to reconnect. Then on the Assigned Buttons pane, look for any entry for increment/decrement, for example, Heading increase. It looks like this:
Set the left rotary and turn the right rotary to see if those green circles light up. If not, double click to open any of those and check if the key down event and button assignments are correct:
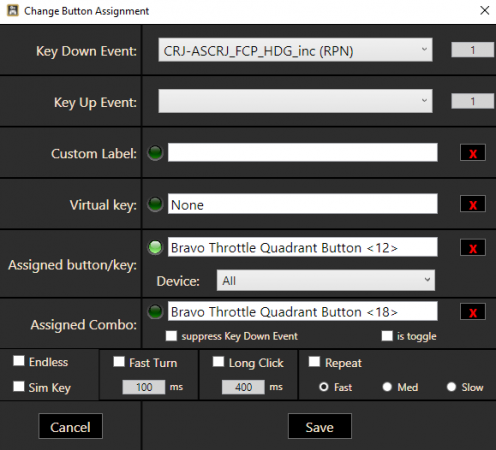
The Key down event is the script that gets triggered. Assigned combo is the button for the left rotary position and assigned button/key is the button for right rotary increase/decrease. Set them to the correct buttons. Let me know if that works.
Regarding the lights on the AP buttons, I have no control over those. The lights are activated by reading standard internal AP variables from the sim and set by the AFC_bridge. The CRJ uses their custom autopilot logic and hence does not use the standard AP variables. That's why the button lights may not tally with the actual buttons.
-
1
-
1
-
-
@daan_vb Try this for increment:
(L:ASCRJ_LSP_RANGE,·Number)·10·+·dnor·(>L:ASCRJ_LSP_RANGE,·Number)·(L:ASCRJ_LSP_RANGE_CHANGE,·Number)·++·(>L:ASCRJ_LSP_RANGE_CHANGE,·Number)
and for decrement:
(L:ASCRJ_LSP_RANGE,·Number)·10·-·dnor·(>L:ASCRJ_LSP_RANGE,·Number)·(L:ASCRJ_LSP_RANGE_CHANGE,·Number)·--·(>L:ASCRJ_LSP_RANGE_CHANGE,·Number)It works like this:
ASCRJ_LSP_RANGE is the animation variable. You take the current value of the animation variable, add/subtract the rotation speed (10 degrees per click) and normalize (dnor) the value in positive degrees (0 - 359) - this is what you set to the animation variable.
ASCRJ_LSP_RANGE_CHANGE is the variable that actually sets the range value in the sim. You take the current value (which is almost always 0 when not changing), increment ++ /decrement -- by 1 to get the value 1/-1 which is what you set the variable to.
Also, make sure you are not leaving a space between the ++ operator. It is a unary operator meaning increment the previous operand by 1, as opposed to the + operator which is binary, meaning apply the operator between the previous two operands.
Hope that makes sense
-
1
-
1
-
-
@Crabby What other buttons are you using in your templates? I have also been experimenting with the buttons on the left side panel (the ones that might be frequently used such as the nav source selector, bearing pointers, etc.) and some hard to reach ones like landing elevation selector on the upper overhead. I am a bit busy with work, but when I get a chance I'll upload them as well.
@Mathijs Kok Thanks for the generosity
. I'll keep that in mind for future products.
-
1
-
1
-
-
@Rick Kumar For the autopilot to work on the Bravo, make sure you have imported and applied the ASCRJ_FCP_HCBRAVO.tmpl as well; it contains the bindings for the autopilot. Also, the autopilot button does not disengage the autopilot - I have kept it like that since the click action in the cockpit on the AP ENG button works that way (only engage, not disengage); although I believe that it is a bug, and the real CRJ's button actually works like a toggle.
-
Thanks @Mathijs Kok! Loving the aircraft, congratulations to the team
-
Axis and Oh's Templates for Aerosoft CRJ 550/700
Hi! Here are a few Axis and Oh's templates for Aerosoft CRJ to use with the Honeycomb Alpha Yoke and Bravo Throttle Quadrant.
The following templates are provided:
- ASCRJ_YOKE_HCALPHA
- ASCRJ_TQ_HCBRAVO
- ASCRJ_FCP_HCBRAVO
Additional RPN scripts are also provided to customize your hardware setup.
Link: Flightsim.to • Axis and Oh's Templates for Aerosoft CRJ by FltsimFlyboy
Notable Features
- Cockpit animations and sounds associated with hardware controls
- Multiple interaction modals for controls - press, long press, press and hold, etc.
- Autopilot Flight Control Panel support
- Custom throttle lever bindings enabling SHUT OFF/IDLE movements
- Custom reverser bindings to automatically stow and disengage reversers when the handles are released (without the need to wiggle the levers)
Improved Throttle Operation!
You need to use the commercial 2-engine setup for the levers on the TQ, using the middle two slots. Before starting the aircraft, move the throttle levers down to the detent button position. This corresponds to the throttle SHUT OFF position. When you need to introduce fuel to the engine, simply push forward the levers out from the detent position to the axis low position. This corresponds to clicking the red guards and moving the throttle to the IDLE position to introduce fuel. You will see the red locks disengaging automatically and the throttles moving to the IDLE position. To cut fuel and turn off the engines, move the throttle levers back to the detent position. You will see the red guards lifting automatically and throttles moving to the SHUT OFF position.
To engage the thrust reversers, pull the reverser handles back. This corresponds to setting the maximum reverse thrust. To disengage reverse thrust, just release the reverser handles. This will set the engines to IDLE, like in the real aircraft.
Note: No axis bindings are provided as part of the template. You need to set up your axis bindings according to Aerosoft's recommendation for the CRJ in the MSFS controls settings.
GitHub Link for the project
GitHub - asmitde/axisandohs_templates: Scripts and templates for Axis and Oh's [MSFS]
-
5
-
6
-
2

Axis and Oh's Templates for Aerosoft CRJ 550/700 - with cockpit animations and improved throttle binding
in Hardware with Aerosoft CRJ for MSFS
Posted
For the press and release animation to work correctly, you have two options:
1) For the AP button, configure both the key down and key up events and assign different scripts to them. For key down it will be 1·(>L:ASCRJ_FCP_AP_ENG,·Number) 1·(>L:ASCRJ_FCP_AP_ENG_BTN_ANIM,·Number), and for key up it will be 0·(>L:ASCRJ_FCP_AP_ENG_BTN_ANIM,·Number).
2) Configure only the key down event and assign the action and the animation with a delay (sleep) in between like 1 (>L:ASCRJ_FCP_AP_ENG_BTN_ANIM, Number) 1 (>L:ASCRJ_FCP_AP_ENG, Number) (SLEEP:100) 0 (>L:ASCRJ_FCP_AP_ENG_BTN_ANIM, Number)
Take a look at the included scripts for reference: https://github.com/asmitde/axisandohs_templates/blob/f673b96b618bda27369506cee32cf5b3abab1ebe/aerosoft_crj/ASCRJ_FCP_scripts.xml#L94
For 3-position switches, you have to check how they are made available in the system. If they show up as 3 separate buttons, you can have 3 separate assignments to each button with corresponding scripts. Now these can be different Lvars, or the same Lvar taking different input values for each position, depends on the specific control.